Your computer leans on a handful of systems to keep browsing smooth, and one of the most important is the Domain Name System (DNS). Every so often the DNS records it has saved go stale or get corrupted, and you end up with slow page loads, sites that refuse to open, or a domain that works on your phone but not on your laptop. That is when you flush the DNS cache.
If you have heard the term and never been sure what it means, why it matters, or how to actually do it on a Mac or a Windows PC, this guide walks through it step by step, in plain language. It also covers what to try when flushing the cache does not fix the problem, so you are not left guessing.
What DNS is, and why it matters
Before you start clearing caches, it helps to know what DNS does and why it sits underneath almost everything you do online.
DNS, explained
DNS stands for Domain Name System, and it is often called the phone book of the internet. Every time you type a web address (say, zagirova.com) into your browser, DNS translates that readable name into the numeric IP address your computer needs in order to find the server. It happens in a fraction of a second, every single time.
Without it, you would have to remember a string of numbers for every site you wanted to visit. DNS is what makes the web navigable by name instead of by address.

DNS, explained
What the DNS cache is
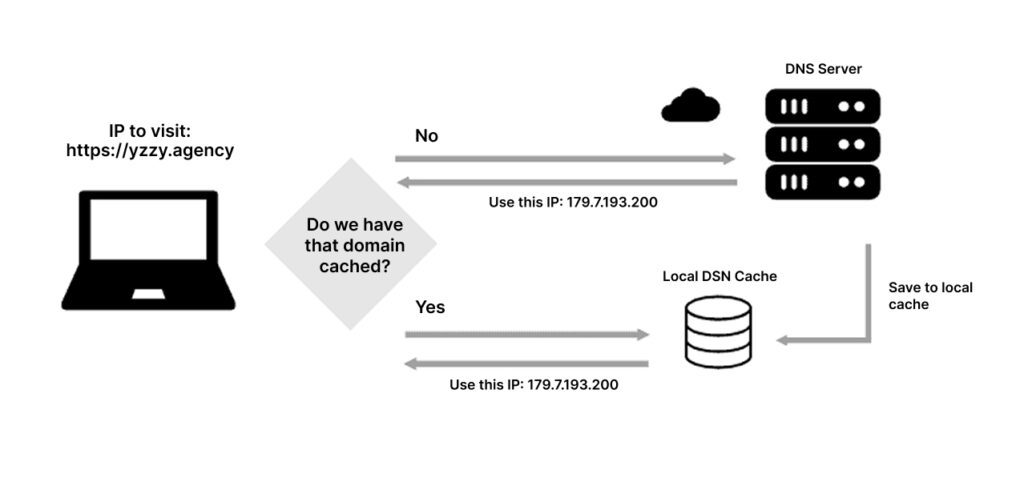
To speed up repeat visits, your operating system temporarily stores the answers it gets back — which domain maps to which IP address — in what is called the DNS cache. If you visited google.com an hour ago, your computer does not look it up again; it reuses what it already has.
That shortcut makes browsing faster. It also causes problems now and then.
What the DNS cache is
Why you would flush DNS
Flushing the cache wipes those saved answers and forces your system to ask for fresh ones. That clears up a few common headaches:
1. Reaching a site after a DNS change — if a site recently moved to a new host, your cached record may still be pointing at the old server.
2. Fixing connection errors — a corrupted or outdated cache can stop pages from loading at all.
3. Getting speed back during network trouble — clearing the cache refreshes your lookups and often makes browsing feel responsive again.
4. Cleaning up a privacy trail — the cache is a record of the domains you have visited, so clearing it removes that local trace.
Now that the why is out of the way, here is the how, on both Mac and Windows.

Why you would flush DNS
How to flush DNS on a Mac
On a Mac the process is short but runs through the command line. Nothing here can break your machine, and if you follow the steps in order it takes about a minute.
Steps to flush DNS on macOS
1. Open Terminal
Terminal is where the flush actually happens. To open it:
You can also find it in Finder under Applications, then Utilities, if you prefer not to search.
– Open Spotlight (press Command + Space).
– Type Terminal.
– Press Return.

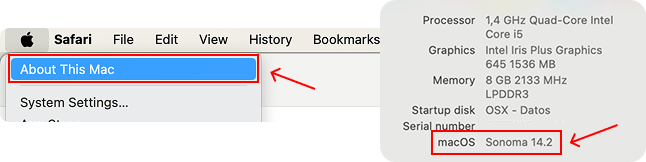
2. Check which version of macOS you are on
The exact command changes slightly between macOS releases, so check first:
– Open the Apple menu and choose About This Mac.
– Note the version number.
3. Run the flush command
Type the command that matches your version and press Return:
– macOS Sequoia, Sonoma, Ventura, Monterey, Big Sur, Catalina and Mojave
sudo killall -HUP mDNSResponder
– macOS Sierra and High Sierra
sudo killall -HUP mDNSResponder
– Older releases (El Capitan or Yosemite, for example)
dscacheutil -flushcache

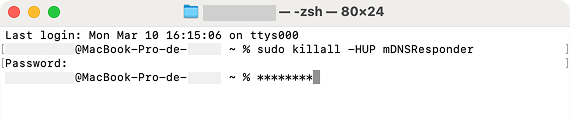
4. Enter your administrator password
Terminal will ask for your administrator password. Type it and press Return. Nothing appears on screen as you type — no dots, no characters. That is normal and intentional.
5. Restart your browser (optional)
Quit your browser and open it again so it picks up the fresh lookups. From there, browsing should behave normally.
Tip for Mac users
If DNS problems keep coming back, it is often the resolver your network hands you. Switching to Google Public DNS (8.8.8.8 and 8.8.4.4), or another provider you trust, tends to be steadier than the default.
How to flush DNS on a Windows PC
On Windows it is a single command and takes no technical background at all. Here is the sequence:
Steps to flush DNS on Windows 10 and 11
1. Open Command Prompt
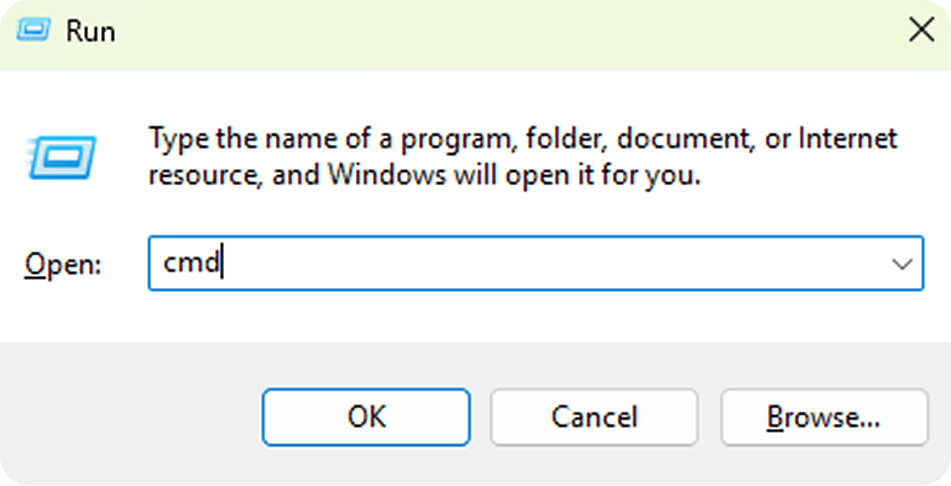
– Press Windows Key + R to open the Run dialog.
– Type cmd and click OK.
– Or search for Command Prompt in the Start menu and choose Run as administrator.
2. Enter the flush command
Type this into the Command Prompt window:
ipconfig /flushdns
Press Enter. You should see a confirmation line:
Successfully flushed the DNS Resolver Cache.

3. Restart your browser and apps As on macOS, close and reopen anything that was having trouble connecting so it picks up the new lookups.
Tip for Windows users
If you run custom DNS settings — Cloudflare or Google, for instance — check that they are still in place in your network adapter properties. Resetting network settings can quietly put them back to the defaults your provider hands out.
Using Windows PowerShell (the alternative)
If you would rather use PowerShell, which is common on managed machines:
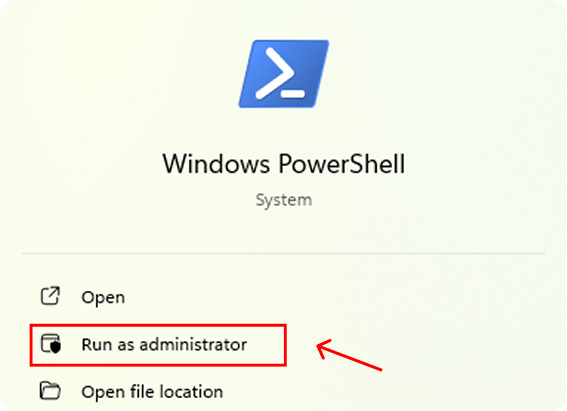
1. Open PowerShell as Administrator.
2. Run this command:
Clear-DnsClientCache

3. Press Enter. PowerShell clears the cache without printing anything back.
That is it — the DNS cache on your Windows machine is clear.
What to do when flushing DNS does not help
Sometimes the cache was never the problem. If the site still will not load, work through these in order:
1. Restart your router
Routers keep a DNS cache of their own. Unplug it, wait 30 seconds, and plug it back in before you try anything more involved.
2. Reset the TCP/IP stack
On Windows you can reset the rest of the network settings alongside the DNS flush:
1. Open Command Prompt as Administrator.
2. Run these commands one at a time:
netsh int ip reset
netsh winsock reset
3. Restart the PC when prompted.
3. Switch to a public DNS resolver
The resolver your internet provider assigns is not always fast or reliable. Point your system at one of these instead:
– Google Public DNS — 8.8.8.8; 8.8.4.4
– Cloudflare DNS — 1.1.1.1; 1.0.0.1
– OpenDNS — 208.67.222.222; 208.67.220.220
4. Clear your browser cache
DNS is not the only cache that can get in the way. Clearing the browser cache rules out stale local data masking a DNS record that is already correct.
5. Scan for malware
DNS errors that survive everything above are sometimes the work of malware redirecting your lookups. Run a full antivirus or anti-malware scan and remove whatever it finds.
6. Call your internet provider
If nothing has worked, the outage may be on their side. Their support team can confirm whether their resolvers are having a wider problem.
Signs the problem is not DNS at all
– Sites load on one device but not another on the same network.
– Sites fail over Wi-Fi but load fine on cellular data.
Either pattern usually points somewhere else — failing hardware, a browser extension, or a setting specific to that one machine.
Final thoughts
Flushing the DNS cache is a small move that solves a surprising share of connection problems. It gives your computer current routing information, clears out records pointing at servers that moved, and often restores speed that seemed to disappear for no reason. On a Mac or a PC, the steps are short enough that anyone can run them.
Keep in mind that it is not a cure-all. When it does not work, the next steps are the ordinary ones: restart the router, switch to a public resolver, clear the browser cache, scan for malware.
Worth knowing either way — and if keeping DNS, email and uptime working is not a job you want to own, that is exactly what managed hosting is for.
We do not just write about this. We build it and we run it.
Stores, integrations, websites and intelligence already in production. Serving North America and LATAM since 2008.